
- What's New
-
Shop
- Contact
Setting up my client’s envelopes for wedding guest addressing always seemed like the hardest task, and at the beginning of my biz, I honestly thought I would rather hand-calligraph each one than figure it out. Lucky for me (and my poor fingers), setting up data merge for variable guest address printing is a breeze and well worth the extra few clicks. Here’s how you can set up data merge in Adobe InDesign for your wedding clients’ guest addresses.
Excel may be the obvious choice here, but I use Google Sheets. (That way my bride can easily edit it and no back-and-forth-files that leave room for error.) Make sure each column is clearly named. I keep it simple: Name, Address Line 1, Address Line 2, City, State, and Zip, but feel free to add whatever you want! Then download it as .csv file for the next step.

Tip: I also use this add-on (shown below) to format the addresses to all caps or all lowercase if my design calls for it.

Once you have your “envelope,” go ahead and open up a text box and type in an address the way you’d like the rest to be formatted. This is where you’ll set up your font, color, spacing, placement, etc.

This is where the magic happens!


When you’re finished, it will look a little something like this.

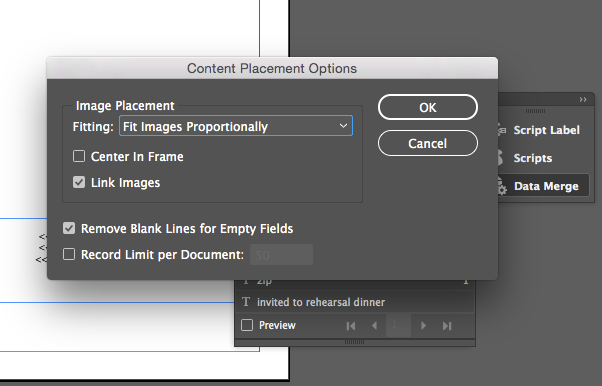
Tip: Some addresses only have one address line instead of two? To get rid of that pesky extra space when there is no entry in the optional Address Line 2, click on the little hamburger menu in the panel (the same one where you found ‘select data source’) and hit Content placement options > remove lines that are blank. Boom! Problem solved.
Check ‘preview’ to see how it looks. You can scroll through the addresses using the arrows for a quick peek.
And for the grand finale, select ‘create merged document.’ Now you have all the addresses in one document, you creative genius, you!
For printing, you’ll want to export your new PDF. Select File > Export to save it as a multi-page PDF. I print directly from the PDF instead of InDesign because I find the color matching and setup to be better, but you can print from inDesign as well! Experiment to find what works for you!

You’ve officially set up your mail merge, and you can conquer the (wedding stationery) world! Any questions or hang ups? Leave me a comment below!


Lauren
April 13, 2021
This is a fantastic tutorial!!! Been trying to figure this out for some time and you just saved me SOOOOOOO much time. Thank you so much for your wilingness to share!